SAML service provider
- About
- Overview of SAML
- Instalation
- Configuration and Settings
- Identity provider configuration
- Our Service provider configuration
- Settings and Customization
- Use Custom Certificate
- SAML SSO Integrations
- Configuring Keycloak Identity provider
- Configuring OneLogin Identity provider
- Configuring Auth0 Identity provider
- Configuring Okta Identity provider
- Configuring AzureAD Identity provider
- FAQ and Troubleshooting
- changelog
- Roadmap
About

ConcreteCMS SAML Service provider package is an OASIS SAML v2.0 specifications compliant . It offers an elegant and easy configurable support for your ConcreteCMS Website or Application to use the Security Assertion Markup Language (SAML) as an authentication scheme for Single Sign-On (SSO), using information that your supported identity provider (IdP) supplies and provide you access to Cloud and intranet websites using a single credentials entry.
This package will make your ConcreteCMS acts as a SAML Service Provider (SP) which can be configured to establish trust between ConcreteCMS and a SAML compliant Identity Provider (IdP) to securely authenticate users.
It supports all known SAML2 Identity providers and It has been tested with various IdPs : Okta, OneLogin, 0Auth
This tool are meant solely to support individuals who have taken the time to read and understand the SAML specifications and a good solution for those looking for a quick way to implement SAML .
If you need some highly custom SAML more secure implementation or/and adding some new other features . Please feel free to contact us .
Features
-
Out of the box support of SAML 2.0 specification .
-
Simple yet highly configurable with easy Installation and Setup
-
Complete and detailed documentation
-
Supports all SAML-compliant identity providers (OKTA, OneLogin, Keyloak... ) .
-
Fully supports Service Provider initiated Flow .
-
Supports Signed SAML requests .
-
Signed SAML responses and/or Assertions are supported.
-
Options to select SAML Request binding type (Supports HTTP POST and HTTP Redirect)
-
Supports HTTP POST and HTTP Redirect SAML Bindings for Identity provider responses .
-
Custom Signing Certificate .
-
Multiples Identity providers configurations .
-
Basic Attribute Mapping (First Name, Last Name) .
-
Import Identity provider Metadata file .
-
Export Service provider Metadata file .
-
Login form customization.
-
Supports both SSO and ConcreteCMS’ own default login at the same time
-
Secured Against Man In the Middle Attack, Forged Assertion, Replay attacks
-
Easy to diagnose and fix realted issues (Activity logging for every action happens on your SSO Flow) .
SAML Limitations
-
There is no support for the SOAP binding
-
SAML1.0 is not supported.
-
Identity Provider initiated Flow is not supported .
-
Encryption is not supported .
-
SAML Single Logout (SLO) is not supported.
Our responsive support team has helped many customers bring interoperability with all khown Identity providers vendor to their systems. We will guide you through the process to set up your SSO applications.
Please feel free to contact us .
https://www.xanweb.com/kontakt
Overview of SAML
What is SAML
SAML (Security Assertion Markup Language) is an XML-based protocol standard for sharing/exchanging security information about identity, authentication and authorization across different systems. allowing for a web-based, cross-domain Single-Sign-On (SSO) experience.
SAML helps reduce the administrative overhead of distributing multiple authentication tokens to the user which makes Single-Sign-On (SSO) technology possible by providing a way to authenticate a user once and then communicate that authentication to multiple applications.
Glossary of common terms
-
A Service Provider (SP) is any entity that provides services, typically the services for which users seek authenticated, including in the form of an Website / Application . In this case our ConcreteCMS website. The Service Provider uses the assertions that it receives from an Identity Provider to authenticate users and then provide access to the requested federation resources.
-
An Identity Provider (IdP) is the entity providing /administers the identities informations, it stores and confirms identity, including the ability to authenticate a user, typically through a login process. such as Okta or OneLogin ...
-
A SAML Request, also known as an authentication request, is generated by the Service Provider to "request" an authentication.
-
A SAML Response is generated by the Identity Provider. It contains the actual assertion of the authenticated user. In addition, a SAML Response may contain additional information, such as user profile information and group/role information, depending on what the Service Provider can support.
How does SAML work
The SAML workflow below reflects the process when the user navigates to our ConcreteCMS website first, is redirected to the Identity Provider for login, and redirected back to us .
A SAML Request is sent to the Identity Provider, user authenticates against the Identity Provider and then information about user, is sent to our Service provider in a SAML Response, wich validates it and authenticate user .
There are two SAML authentication workflows: IdP initiated SAML authentication and SP initiated SAML authentication.
Our ConcreteCMS service provider package support only SP initiated SAML authentication.
A typical SAML authentication process for authentication (SP initiated SAML authentication) works this way:
-
The service provider requests authentication information about that specific user from the end user's identity provider.
-
The identity provider responds to the SAML request with a SAML formatted, digitally signed response that identifies the end user and may include further information indicating that the user "is" or "is not" authenticated and authorized or not to access restricted resources.
-
The service provider validates the response from the identity provider and authenticates the end user to give them access to restricted resources.
-
The end user accesses the service provider's content or application.

Instalation
Server Requirements : PHP version: >= 7.4
- Connect to the marketplace from your dashboard and install the package
-
Unzip this file in your site's packages/ directory.
-
Login to your site as an Administrator.
-
Find the "Add Functionality" page in your dashboard.
-
Find this package in the list of packages awaiting installation and click the "Install" button.

Configuration and Settings
This topic describes how to configure the system as a SAML service provider. When the system is a SAML service provider, it relies on the SAML identity provider authentication and attribute assertions when users attempt to sign in to ConcreteCMS . We need to configure both the service provider and Identity provider appropriately to talk to each other. To enable SAML single sign-on, you must provide: 1) Identity provider with certain data from our Service provider . 2) Our Service provider with certain data from Identity provider
Identity provider configuration
The SAML standard means that a wide range of identity providers will work with our ConcreteCMS SAML Service provider .
In Identity provider (IdP) side, configuration instructions will vary depending on the vendor, as an administrator please refer to the Identity provider vendor-specific documentation for details. It may have relevant documentation and it may be generic SAML documentation, or specifically targeted for specific Service provider.
List of some of the Identity Providers with links refer to its official documentation to configure a SAML integration.:
-
Auth0
-
ADFS (Active Directory Federation Services)
-
OneLogin
-
Okta
-
Salesforce
-
SecureAuth
-
Centrify
-
simpleSAMLphp
When configuring your identity provider, please consider the notes below to help avoid common issues and as a guide for terminology used .
Our ConcreteCMS SAML Service provider needs to provide some informations to the Identity Provider .
Go to " Dashboard > SAML Service Provider > Configuration and Settings " page .

Add the SAML informations on this page to the Identity Provider (IdP) administration side page so the tenant knows how to receive and respond to our SAML authentication requests.
If the IdP supports uploading a Metadata file, you can simply provide the file obtained in the step below.
SAML Metadata file is the standard format for exchanging configuration information between SAML service provider and the Identity provider . SAML metadata is supplied to partner Identity providers so they can update their
configuration .
Click Export Metadata button in the bottom of SAML Info section to download an XML file of your SAML configuration settings to send to your Identity provider .
You must Save new changes to enable Export again If you already change some values .

The Identity provider can then upload these configuration settings to connect to our SAML Service provider package .
If the IdP does not support uploading a Metadata file, you can configure it manually as follows. You will need to use some of this informations from this screen to configure it .
FIELD |
DESCRIPTION |
Name |
Your service provider name for reference |
Entity ID / Issuer |
The unique identifier of the Service providerThis value is prepopulated. It is generated by the system ( Read only ). |
Assertion Consume Service (ASC) Endpoint |
Often referred to simply as the Sign-in URL or Application Callback URL . This is the endpoint provided where SAML responses are posted by Identity provider after it has authenticated a user .This value is prepopulated. It is generated by the system ( Read only ). |
Request protocol Binding |
Choose the binding mechanism your identity provider requests for your SAML messages.
|
Sign request (optionel) |
Indicates whether our Service provider signs the SAML authentication request when it initiates the single sign-on flow. So all sent requests to the Identity provider will be signed .This option overrides the IdP config setting Want AuthnRequest Signed . When selected, you must provide the Identity provider with a copy of your Certificate to verify the validity and provenance of the SAML requests from your service provider.So, you can send a signed SAML request from your Service provider to the IdP to verify your SP as an authentic service provider. you can configure your IdP to use the certificate stored in the security section to ensure the SAML request originates from your Service provider Get your certificate in the "Security" section. |
Want Signed Assertions(optionel) |
Defines whether SAML assertions coming from Identity Providers (IdPs) must be signed., Note that the Identity provider is not obligated by this, but is being made aware of the likelihood that an unsigned assertion will be insufficient . |
Certificate |
An X.509 certificate and associated private key are required if SAML messages sent by our service provider (SP) are to be signed (When the Sign Request option is enabled) |
NameID format |
urn:oasis:names:tc:SAML:1.1:nameid-format:emailAddressEnsure that you configure the as Email format. |
Recipient |
Typically the same value as our Entity ID / IssuerThis value is not required for all integrations. |
Audience |
Typically same value as our Assertion Consume Service (ASC) EndpointThis value is not required for all integrations. |
SAML Offset Minutes |
Set to make up for time differences between devices.This value is prepopulated. It is generated by the system : 5 minutes.
|
Our service provider (SP) requires certain attribute information to be received from the IDP when a user signs in using SAML logins. The NameID attribute is mandatory and must be sent by your IDP in the SAML response to make the federation with ConcreteCMS work. Since Our SP uses the value of NameID to uniquely identify a named user, it is recommended that you use a Email format value.
The IdP needs to pass certain information in order for our SP to either create an account, or match the login information to an existing account. Email is the minimum amount of information that needs to be passed. If the IdP is not providing this information, all SAML requests fail. Make sure this information is provided.
We automatically uses the SAML NameID to identify users in ConcreteCMS . We recommend setting and configure your IdP so that NameID format is Email Address .
We specifies urn:oasis:names:tc:SAML:1.1:nameid-format:emailAddress for the format of the NameIDPolicy in assertion requests.
At a minimum, If there is no NameID element with Email Address Format, the user’s email address must be specified as an Assertion Attribute. The name of the Attribute that specifies user email address must be configured as email or mail or http://schemas.xmlsoap.org/ws/2005/05/identity/claims/emailaddress
Contact the administrator of the identity provider if you need help determining which source of metadata information you need to provide.
No matter what Request Binding you select, the SAML response up to Identity provider side configuration . We currently support POST and Redirect Binding fror SAML response .
Most Identity providers requires at least the following : Assertion Consume Service (ASC) Endpoint .
Requests and responses must conform to the SAML protocols for exchanging information .
Your IdP must support SAML 2.0 to connect with our ConcreteCMS SAML service provider .
Some Identity providers cannot accept a signed authentication request ( when Sign Request option is enabled ) .
Sign Request is optional. Some Idps does not validate signed authentication requests even a signature is present.
If the Want Assertion Signed flag is set and neither the SAML response nor SAML assertion is
signed or the signature cannot be verified, this is considered an error .
However, certain changes in the Service provider will impact your SAML configuration. If any of these changes occur, the metadata is automatically updated on your SP side, but you will need to update the information on the Identity Provider side so that message exchange can occur successfully.
As always with SAML2, you can't expect all Idps to support everything. you have to test if your Idp supports some required options
Many SAML terms can vary between providers. It is possible that the information you are looking for is listed under another name. For more information, start with your identity provider’s documentation. Look for their options and examples to see how they configure SAML. This can provide hints on what you’ll need to configure our Service provider to work with these providers.
The following articles outline configuration instructions for four common third-party Identity providers:
-
Configuring Auth0 SAML Identity provider
-
Configuring OneLogin SAML Identity provider
-
Configuring Keyloak SAML Identity provider
Our Service provider configuration
After doing configuration In Identity provider side (previous page), we need to configure our Service provider to complete the SAML setup.
This article provides an generic example walk-through of configuring an Identity Provider (IdP) in the system .
It is recommended that you or administrators already configuired an IdP from his vendor-specific side before proceeding...
Go to " Dashboard > SAML Service Provider > Identity providers " page
Select your Identity provider, If you don't see your targeted provider listed, choose "Custom IdP" .

The following values must be provided, and there’s often quite a few of them. but as an administrator you’ll need to provide at least some of this informations:
Name, EntityID, Single Sign On Service Endpoint (Redirect binding) or (POST binding) and X509 Certificate

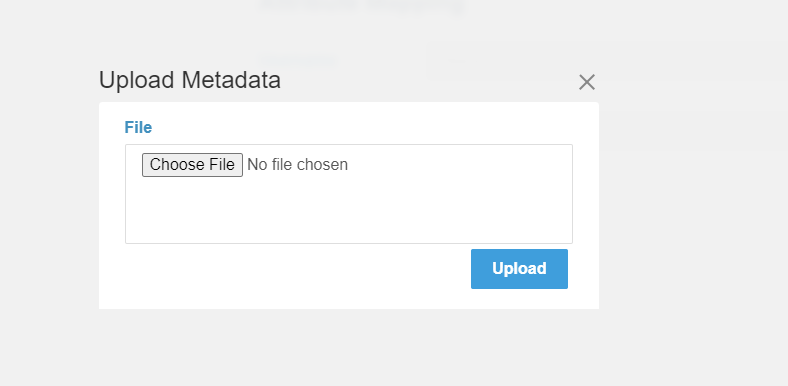
Some Identity providers may offer an Metadata XML document during the configuration process on their sides . This file contains all the information requested in following sections. If you have this file, you can click in Import Metadata button .

And you can now upload it . Select that file and click in Upload button,
and the system will parse it to populate the required fields in following sections.
Alternatively, You can fill out the required fields from the output obtained during your specific Identity provider (IdP) side configuration.
1) Details section
FIELD |
DESCRIPTION |
Issuer / EntityID |
The unique identifier of the Identity provider |
Single Sign On Service Endpoints( POST / Redirect ) |
URL's where our service provider sends a SAML request to start the login sequence .One endpoint URL at least is required (POST Or Redirect ) . |
Signing Certificate |
The certificate that Identity provider used to digitally signe a SAML response / assertion . Our service provider uses it to validate the signature of the SAML authentication response / assertions . |
Want AuthnRequests Signed (optionel) |
Indicate that if this Identity provider want signed SAML request, so all sent requests to it will be signed . |
Name |
The display name of the Identity provider as a reference |
Description (Optionel) |
Short description of the Identity provider. |
Icon (Optionel) |
Image reference of the Identity provider |
Request Protocol Binding of your Service provider configuration (See Configuration and Settings page) use one of this endpoints according to selected binding .
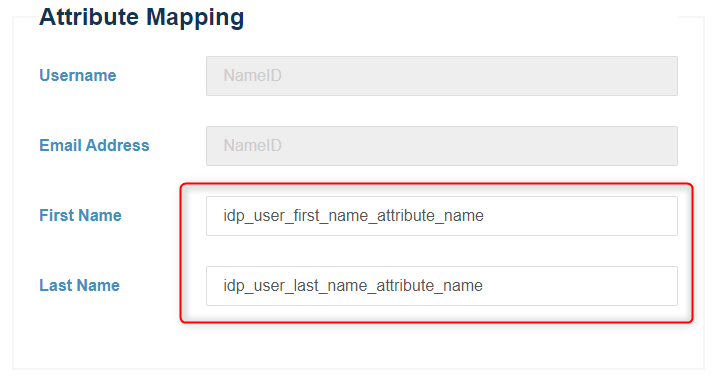
2) Attributes Mapping section
Sometimes the names of the attributes sent by the Identity provider does not
match the names used by user for the ConcreteCMS accounts. In this
section we must set the mapping between IdP fields and ConcreteCMS fields .
So this feature allows you to map user attributes sent by the IdP during SSO to the user attributes (first name and last name) at ConcreteCMS .
Fill out mapping fields (First name , Last name) by attributes names obtained during the Identity provider side configuration.
Every attribute must have its own unique representation in a SAML attribute assertion to ensure that there are no misinterpretations or miscommunication. Thus, SAML exchanges rely on consistent attribute naming to deliver information about users in a way that is mutually understood between the IdP and SP. This attribute name must be expected and handled by relying parties.
As a best practice, users should use their emails as the primary connection ID to log on via the SAML plugin because it is always a unique value. While users can be configured to use other attributes such as their first name or last name, these may not always be unique values within an organization.
Configure your IdP so that the NameID specifies an element to identify a user. We recommend using Email as user Identifier .
Note that we automatically use NameID value sent by the Identity provider as Email address , and to generate Username
We fetch users from both Email Adress and Username and if in both cases the user is not found, a new user is created (If JIT provisioning option is enabled)
Note that if First Name / Last name inputs are empty we ignore mapping them .
Note that if ConcreteCMS user account doesn't have predefined ConcreteCMS User Attributes with Handle "first_name" and "last_name" otherwise attributes will not be added and the provided Info ignored . Visit this ConcreteCMS Doc to mannuely add them as an Administrator .
If the configuration is set up correctly . Save your changes by clicking the Save button in right bottom of your page.
Cancel your changes and go back to main "Identity providers" page by clicking the Cancel button in left bottom of your page.

And at this point, you have successfully configured an Identity provider in the system.
The new SAML configured IdP is added to your Configured Identity provider list
in " Dashboard > SAML Service Provider > Identity providers " page .

When you've set up a IDP, you can update the settings for it by clicking it .
We need to assign this Identity provider as the active one in the system .
Navigate to " Dashboard > SAML Service Provider > Configuration and Settings "
Go to the bottom of Settings section and select your configured identity provider (from step above) appeared in the configured IdPs list .

Save your changes by clicking the Save button in right bottom of your page.
And at this point, you have successfully activate your Identity provider in the system
Click Activate and Save to show your End Users the Login form .

You should now able to see a ‘SAML’ option in the ConcreteCMS login screen . This will redirect users to login to the Identity provider instance for their username/password and will create a new ConcreteCMS user account with chosen group (If JIT provisioning option is enabled) .
Once you've completed the setup steps, it's important to test to make sure everything is working properly.

You did it! Your ConcreteCMS Website is configured to provide SAML SSO services. Your users may sign in to your website with the username and password stored by your SAML 2.0 identity provider.
If errors are presented, ensure that all necessary fields have been correctly populated .

Double-check your steps. If you are still having trouble . first check the configuration of your service provider in your side and the identity provider from it vendor side . Also check Troubleshooting && FAQ page to inspect the ConcreteCMS logs.
Settings and Customization

Activate
When enabled, specialized logon page displays when logging on, allowing a user to log on with SAML.
Easily switch On/Off the SAML Module.
Identity provider
JIT provisioning Option
With JIT provisioning, you can use a SAML Assertion to create users the first time they log in to your concreteCMS from a third-party identity provider. JIT provisioning saves you time and effort because it eliminates the need to provision users or create user accounts in advance. we fetch the user from email (in NameID or Assertion attributes) and if in both cases the user with that email is not found, a new user is created.
You can set the default Group for new JIT users. The default role is None, but you can choose to add new JIT users as Administrators or other new ConcreteCMS created group.
Force authentication
If enabled, users having a current, active SSO session will be re-authenticated by the identity provider .
Sets the ForceAuthn attribute on generated SAML requests, requesting that the IdP re-authenticate the user.
Default After Login Redirect Url
When an unsolicited SSO response arrives at the Service Provider , the user (if authenticated) is redirected to this default URL.
The URL to which SP redirects successfully authenticated end users.

You can customized login page 
Advanced

Use Custom Certificate
An X.509 certificate and associated private key are required if SAML messages sent by our service provider (SP) are to be signed (When the Sign Request option is enabled) .
Certificate is published with your SAML metadata and is freely distributed to your relying parties. Private key, just as it’s name says, should remain private and for your eyes only. Due to security issues, certificates expire after some time, and you have to renew them in order to keep SAML signing working.
By default, Our SP uses the tenant private key to sign SAML requests (When the Sign Request option is enabled ).We recommend to provide your own credential key pair to ensure secure data transfers with identity providers.
The steps below are an example of the process for generating a public/private key pair for key exchange, using OpenSSL. To execute the following commands, you will need an OpenSSL runtime installed (which you can download and install from the OpenSSL website, or install one from your operating system’s package management system) .
1) You can generate your own certificate and certificate using this command :
openssl req -new -x509 -days 365 -nodes -sha256 -out sp_certificate.crt -keyout sp_private.key2) Provide information at each prompt .
Two files, sp_certificate.crt and sp_private.key, are created in the directory where you ran the command .
4) In Security section, click Delete on the certificate you want to delete. The Delete Certificate window displays. Click Yes to confirm. Otherwise, click No.

5) Add your last generated files here

6) Click on Save
Use certificates with strong cryptographic keys for digitally signing or encrypting SAML messages, and renew or replace the certificates every three to five years.
Neither the private key file nor its password should be shared with third parties .
Make sure that all of your certificates are valid, and have not expired or been revoked.
Enabling signed requests requires that the IDP be updated whenever the signing certificate used by the SP is renewed or replaced.
SAML SSO Integrations
Configuring Keycloak Identity provider

If your organization uses Keycloak Identity Provider (IdP) for user authentication, you can configure SAML Service provider to allow your users to log in to your ConcreteCMS website using their IdP Keycloak credentials.
Configuration for SAML must be done in two places: at the IdP (Keycloak) and at the SP (Our SAML Service provider package) .In the next sub-chapters, we'll provide guidelines for a basic configuration of Keycloak IdP and how to set up it as your identity provider .
Prerequisite : You must have an Install Keyloak server in your Host and run it .
These steps reflect a third-party application and are subject to change without our knowledge. If the steps described here do not match the screens you see in your IdP account, you can use the general SAML configuration steps, along with the Keyloak IdP’s documentation (https://www.keycloak.org/documentation ) .
1) Add our Service provider informations to Keycloak
The next step enables you to retrieve the information Keycloak needs to work with our SAML Service provider .
Go to " Dashboard > SAML Service Provider > Configuration and Settings " page in our package .
Click Export Metadata button in the bottom of SAML Info section to download an XML file of your SAML configuration settings to send to Keycloak Identity provider.

2) Setup Keycloak IdP
Follow the steps below to configure Keyclock as an Identity Provider
Go to your Keycloak Admin console, select the realm that you want to use.
Select Clients in the right menu and select Create

Use Select file to open the xml file you've saved earlier. (Step 1)

Once imported, Save your settings.

You'll see the following screen, leave its settings untouched unless you know what to configure beyond standard configuration.

3) Add Keycloak IdP informations Into our SAML Service provider
and Save XML File from that link .
Go back to our SAML Service provider package and go to " Dashboard > SAML Service Provider > Identity providers " page .
and select Keycloak Idp from list shown .

The last file contains all the information requested in following sections. If you have this file, you can click in Import Metadata button . And you can now upload it . Select that file and click in Upload button, and the system will parse it to populate the required fields in following sections.


Click on Save

Your configured IdP will be shown in " Dashboard > SAML Service Provider > Identity providers " page .
And at this point, you have successfully configured Keycloak as an Identity provider in the system .
If you have some wrong inputs in previous step , you can edit your configured identity providers by clicking it.
Go to " Dashboard > SAML Service Provider > Configuration and Settings " page .
In Settings section, select your configured identity provider (from step above) appeared in the configured IdPs list .

Click on Save .
After successfully test your connection, you must check your settings in Settings and Appearance sections in the same page .
Activate the system to show your End Users the Login form .

Click on Save .
You should now be see a ‘SAML’ option in the ConcreteCMS login screen . This will redirect users to login to the keycloak instance for their username/password and will create a new ConcreteCMS user account with chosen group (If JIT provisioning is enabled) .
For a better understanding and more advanced configuration please check out the official Keycloak documentation. Also please refer to previous pages in this documentation.
If you are experiencing issues while testing the connection to the Keycloak server, first double-check the configuration options in SAML Service provider package and in Idp ( keycloak ) side . Also check Troubleshooting && FAQ page
Once you've completed the setup steps, it's important to test to make sure everything is working properly.
If you encounter any issues, check to make sure that the values in your IdP and your Service provider match .
You can also refer to the Troubleshooting section: see Troubleshooting.
Configuring OneLogin Identity provider

If your organization uses OneLogin Identity Provider (IdP) for user authentication, you can configure SAML Service provider to allow your users to log in to your ConcreteCMS website using their IdP OneLogin credentials.
Configuration for SAML must be done in two places: at the IdP ( OneLogin ) and at the SP (Our SAML Service provider package) . In the next sub-chapters, we'll provide guidelines for a basic configuration of Keycloak IdP and how to set up it as your identity provider .
These steps reflect a third-party application and are subject to change without our knowledge. If the steps described here do not match the screens you see in your IdP account, you can use the general SAML configuration steps, along with the OneLogin IdP’s documentation ( https://developers.onelogin.com/ ) .
This document assumes that you've already created an account with your selected Identity Provider.
1) Add our Service provider informations to OneLogin
The next step enables you to retrieve the information OneLogin needs to work with our SAML Service provider .
Go to " Dashboard > SAML Service Provider > Configuration and Settings " page in our package .

In the next step, you will need the following information before heading back to the Configuration of OneLogin :
-
Issuer / EntityId
-
Assertion Consumer Service Endpoint
2) Setup OneLogin IdP
Follow the steps below to configure OneLogin as an Identity Provider :
Log in to your OneLogin admin portal.
Select Dashboard > Applications in the top menu and select Add App .

Search for SAML, and select SAML Test Connector(Advanced) .
Enter your display name and click Save .
Navigate to the Configuration tab .

| OneLogin Audience | Our Issuer / EntityId from Step1 |
| OneLogin Recipient | Our Assertion Consumer Service Endpoint from Step1 |
| OneLogin ACS (Consumer) URL Validator | Our Assertion Consumer Service Endpoint from Step1 |
| OneLogin ACS (Consumer) URL | Our Assertion Consumer Service Endpoint from Step1 |
Click Save .
In the next step, you will need the following OneLogin IdP information before heading to the configuration of our SAML Service provider :
-
Issuer URL
-
Endpoint (HTTP)
- X.509 Certificate

Or you can download an XML Metafile file of OneLogin IdP SAML configuration , on the same last page just go to More Actions → SAML Metadata and choose SAML Metadata

3) Add OneLogin IdP informations Into our SAML Service provider
Go back to our SAML Service provider package and go to " Dashboard > SAML Service Provider > Identity providers " page
and select OneLogin IdP from list shown .


Add this values respectfully .
| Issuer / EntityID | OneLogin Issuer URL |
| Single Sign On Service Endpoint (POST binding) | OneLogin SAML 2.0 Endpoint (HTTP) |
|
Certificate |
OneLogin X.509 Certificate (visible under 'View details' blue link) |

Or you can do the last step by importing Metadata file, the last XML Metadata file contains all the information requested in following sections. If you have this file, you can click in Import Metadata button . And you can now upload it . Select that file and click in Upload button, and the system will parse it to populate the required fields in following sections.


Click on Save

Your configured IdP will be shown in " Dashboard > SAML Service Provider > Identity providers " page .

And at this point, you have successfully configured OneLogin as an Identity provider in the system .
If you have some wrong inputs in previous step , you can edit your configured identity providers by clicking it .
Go to " Dashboard > SAML Service Provider > Configuration and Settings " page .
In Settings section, select your configured Identity provider ( OneLogin ) (from step above) appeared in the configured IdPs list .

Click on Save .
Finaly, you must check your settings in Settings and Appearance sections in the same page .
Activate the system to show your End Users the Login form .

Click on Save .
You should now able to see a ‘SAML’ option in the ConcreteCMS login screen . This will redirect users to login to the OneLogin instance for their username/password and will create a new ConcreteCMS user account with chosen group (If JIT provisioning is enabled) .

For a better understanding and more advanced configuration please check out the official OneLogin documentation. Also please refer to previous pages in this documentation.
If you are experiencing issues while testing the connection to the OneLogin server, first double-check the configuration options in SAML Service provider package and in Idp ( OneLogin ) side . Also check Troubleshooting && FAQ page
Once you've completed the setup steps, it's important to test to make sure everything is working properly.
If you encounter any issues, check to make sure that the values in your IdP and your Service provider match .
You can also refer to the Troubleshooting section: see Troubleshooting.
Configuring Auth0 Identity provider

If your organization uses Auth0 Identity Provider (IdP) for user authentication, you can configure SAML Service provider to allow your users to log in to your ConcreteCMS website using their Auth0 IdP credentials.
Configuration for SAML must be done in two places: at the IdP ( Auth0 ) and at the SP (Our SAML Service provider package) .In the next sub-chapters, we'll provide guidelines for a basic configuration of Auth0 IdP and how to set up it as your identity provider .
These steps reflect a third-party application and are subject to change without our knowledge. If the steps described here do not match the screens you see in your IdP account, you can use the general SAML configuration steps, along with the Auth0 IdP’s documentation .
This document assumes that you've already created an account with your selected Identity Provider.
1) Add our Service provider information to Auth0
The next step enables you to retrieve the information Auth0 needs to work with our SAML Service provider .
Go to " Dashboard > SAML Service Provider > Configuration and Settings " page in our package .
In the next step, you will need the following information before heading to the Configuration of Auth0
-
Issuer / EntityId
-
Assertion Consumer Service Endpoint
2) Setup Auth0 IdP
Follow the steps below to configure Auth0 as an Identity Provider :
Log in to your Auth0 admin portal.
Select Dashboard > Applications in the top menu and select Create Application .

Enter your display name and choose Regular Web Applications and click Save .

Navigate to the Addons tab and activate SAML2 WEB APP .

A new popup has been opened , navigate to the Settings

Add this values respectfully .
| Our Assertion Consumer Service Endpoint from Step1 |
Click Enable.
In the next step, you will need the following Auth0 IdP informations before heading to the Configuration of our SAML Service provider
-
Issuer
-
Identity Provider Login URL:
- Identity Provider Certificate:

Or you can download an XML Metadata file of Auth0 IdP SAML configuration , on the same last page click to Identity Provider Metadata download link .
3) Add Auth0 IdP information Into our SAML Service provider
Go back to our SAML Service provider package and go to " Dashboard > SAML Service Provider > Identity providers " page
and select Auth0 IdP from list shown .


Add this values respectfully .
| Issuer / EntityID | Auth0 Issuer |
| Single Sign On Service Endpoint (POST binding) |
Auth0 Identity Provider Login URL: |
|
Certificate |
Auth0 Certificate ( Download Auth0 certificate and view it in TextEditor and copy it's value ) |

Or you can do the last step by importing Metadata file . The last XML Metadata file contains all the information requested in following sections. If you have this file, you can click in Import Metadata button . And you can now upload it . Select that file and click in Upload button, and the system will parse it to populate the required fields in following sections.


Click on Save

Your configured IdP will be shown in " Dashboard > SAML Service Provider > Identity providers " page .

And at this point, you have successfully configured Auth0 as an Identity provider in the system .
If you have some wrong inputs in previous step , you can edit your configured identity providers by clicking it .
Go to " Dashboard > SAML Service Provider > Configuration and Settings " page .
In Settings section, select your configured Identity provider ( Auth0 ) (from step above) appeared in the configured IdPs list .

Click on Save .
After successfully test your connection, you must check your settings in Settings and Appearance sections in the same page .
Activate the system to show your End Users the Login form .

Click on Save .
You should now able to see a ‘SAML’ option in the ConcreteCMS login screen . This will redirect users to login to the Auth0 instance for their username/password and will create a new ConcreteCMS user account with chosen group (If JIT provisioning is enabled) .

For a better understanding and more advanced configuration please check out the official Auth0 documentation. Also please refer to previous pages in this documentation.
If you are experiencing issues while testing the connection to the Auth0, first double-check the configuration options in SAML Service provider package and Idp ( Auth0 ) side . You may also inspect the ConcreteCMS logs to help pinpointing the problem cause. Debug logs may contain more detailed information about the issues
Once you've completed the setup steps, it's important to test to make sure everything is working properly.
If you encounter any issues, check to make sure that the values in your IdP and your Service provider match .
You can also refer to the Troubleshooting section: see Troubleshooting.
Configuring Okta Identity provider

coming soon.
Configuring AzureAD Identity provider

Coming soon.
FAQ and Troubleshooting
This section contains common SAML problems you might encounter and help you to diagnose and fix issues related to SAML SSO authentication.
When testing and debugging the configuration, an option is to view the messages in the log files. A detailed cause of the failure will be printed in case something goes wrong.
You can find detailed information from every step in the process. This allows for an easy analysis of where potential configuration errors recite. Will also allow for detailed response messages to the user trying to sign in. By default, every failed login attempt always results in this message:" Failed Authentication .” After enabling trace logging, you can see the exact cause of the failure in the browser. In case of exceptions, you can even see the stack trace.
You may inspect the ConcreteCMS logs to help pinpointing the problem cause. Please refer to How can I enable logging in ConcreteCMS documentation.
Choose SAML Service Provider Channel

Debug logs may contain more detailed information about the error.
At some point it may be necessary to confirm/view the SAML message that is actually being released from the IdP and sent to us during the authentication process ; You can view SAML trace logs by installing SAML Tracer extension on your web browsers. To install SAML Tracer :
This section includes some samples to show you what SAML requests and SAML responses might look like ( Using SAML-Tracer ) .
This example below shows a sample SAML Request .

This example below shows a sample SAML Response .

If an error appears before you are redirected to the IdP's login page, the IdP's metadata may be invalid.
If an error appears after you log in on the IdP's vendor page, the reasons could be that:
FAQ
After successfully Login in the Identity provider side nothing happens.
If your SP redirects the request to the identity provider (IdP), but the IdP does not return its SAML sign-in page. The IdP can fail to return the sign-in page for any of the following reasons:
-
Assertion Consume Service (ASC) Endpoint URL provided to the IdP is not valid .
- If a user provides incorrect credentials on the IdP’s sign-in page, or if the user is not authorized to use SAML, some IdPs will not return control to our SP when authentication fails.
- This issue may occur when our Service Provider Metadata is not configured on the IdP side.
- Our request is signed (when Sign Request option is enabled ) and identity provider doesn't have our Certificate and/or can't proccess signed requests .
I can log in to the Identity Provider but not to my ConcreteCMS Site
If you can access the Identity Provider login screen, and login is successful, but you have not been successfully logged in to the your website, it could be due to one of a number of issues.
- Check if the IdP uses a valid NameID format to communicate the subject inside the SAML response. It must be Email Adress format
- If the IdP is encrypting the SAML response , disable encryption option. (no encryption support for now) .
- Current User doesn't exist in your system , and JIT option is disabled .
- If Want Signed Assertions option in your service provider is enabled , make sure the IdP is signing his assertion or response and is using the certificate that is configured for your Service Provider on the Configuration page.
- Check Recipent value ( Same value as your Entity ID / Issuer)
- Check Audience value (Same value as your Assertion Consume Service (ASC) Endpoint)
Support
For immediate troubleshooting, consult our team for a solution.
If you would like to receive support from our's support team, create a support issue on ConcreteCMS Marketplace with the following information:
- a description of your problem and what you were doing at the time it occurred.
- a copy of the error
- plain SAML messages (See above about SAML tracer extension)
- a copy of the application logs (if possible).
You can use the support request form to create a support ticket which will include this information.
We will respond as promptly as possible.
Thank you!
changelog
*** 1.0.0
*** this is the first release.